Embarking on a website migration can feel like moving house for your entire digital presence. It's a high-stakes project where a single misstep can lead to lost traffic, broken user journeys, and a significant drop in search engine rankings. A successful migration, however, can unlock enhanced performance, better security, and an improved user experience that drives growth. The difference between success and failure often comes down to meticulous planning and execution.
This comprehensive website migration checklist is designed to be your definitive guide, breaking down the complex process into eight manageable, crucial stages. Whether you're changing domains, switching platforms like from Magento to Shopify, or undertaking a major redesign, following these steps will ensure your digital assets are protected and your transition is seamless. We will cover everything from the initial SEO audit and content mapping to technical testing, launch day procedures, and essential post-launch monitoring.
Think of this as your blueprint for a smooth transition. It provides the actionable framework needed to navigate this technical challenge, ensuring every detail is perfectly organised. For businesses in Norfolk, Suffolk, and across East Anglia, having a clear plan is the first step toward safeguarding your online visibility and capitalising on the opportunities a new website brings.
1. Pre-Migration SEO Audit and Backup
Before making any changes, the first and most crucial step in any website migration checklist is to establish a comprehensive baseline of your current site's performance. This involves conducting a thorough pre-migration audit to capture a complete snapshot of your SEO assets and creating a full backup. This foundational step ensures you can measure success, diagnose issues post-migration, and prevent catastrophic losses in traffic and revenue.
Think of it as creating an architectural blueprint of your existing digital property. You need to document every URL, all associated metadata, current keyword rankings, and the entire backlink profile. This benchmark becomes your single source of truth, safeguarding years of accumulated SEO value. For example, when The Guardian migrated in 2018, they meticulously backed up and planned the redirection of 2.8 million URLs to preserve their search authority.
Why It's a Critical First Step
Skipping this audit is like navigating without a map. It leaves you unable to prove that the migration caused a drop in rankings or to identify which specific pages lost traffic. A detailed audit provides the data needed to create a precise 301 redirect map, ensuring that link equity is passed correctly to the new URLs and that users don't encounter broken links. To ensure your migration goes smoothly and maintains search visibility, pay close attention to essential technical SEO considerations during your pre-migration audit.
How to Implement Your Audit and Backup
- Crawl Your Entire Site: Use a tool like Screaming Frog or Ahrefs to crawl every single URL on your live website. Export this list to a master spreadsheet.
- Document SEO Elements: For each URL, document its title tag, meta description, H1 tags, and canonical tags.
- Export Performance Data: Download at least 12 months of data from Google Analytics (page traffic, bounce rates) and Google Search Console (clicks, impressions, top queries, ranking positions).
- Backup Your Backlinks: Use a tool like SEMrush or Moz to export your complete backlink profile. This is vital for later verification.
The following infographic illustrates the core workflow for collecting this essential baseline data.
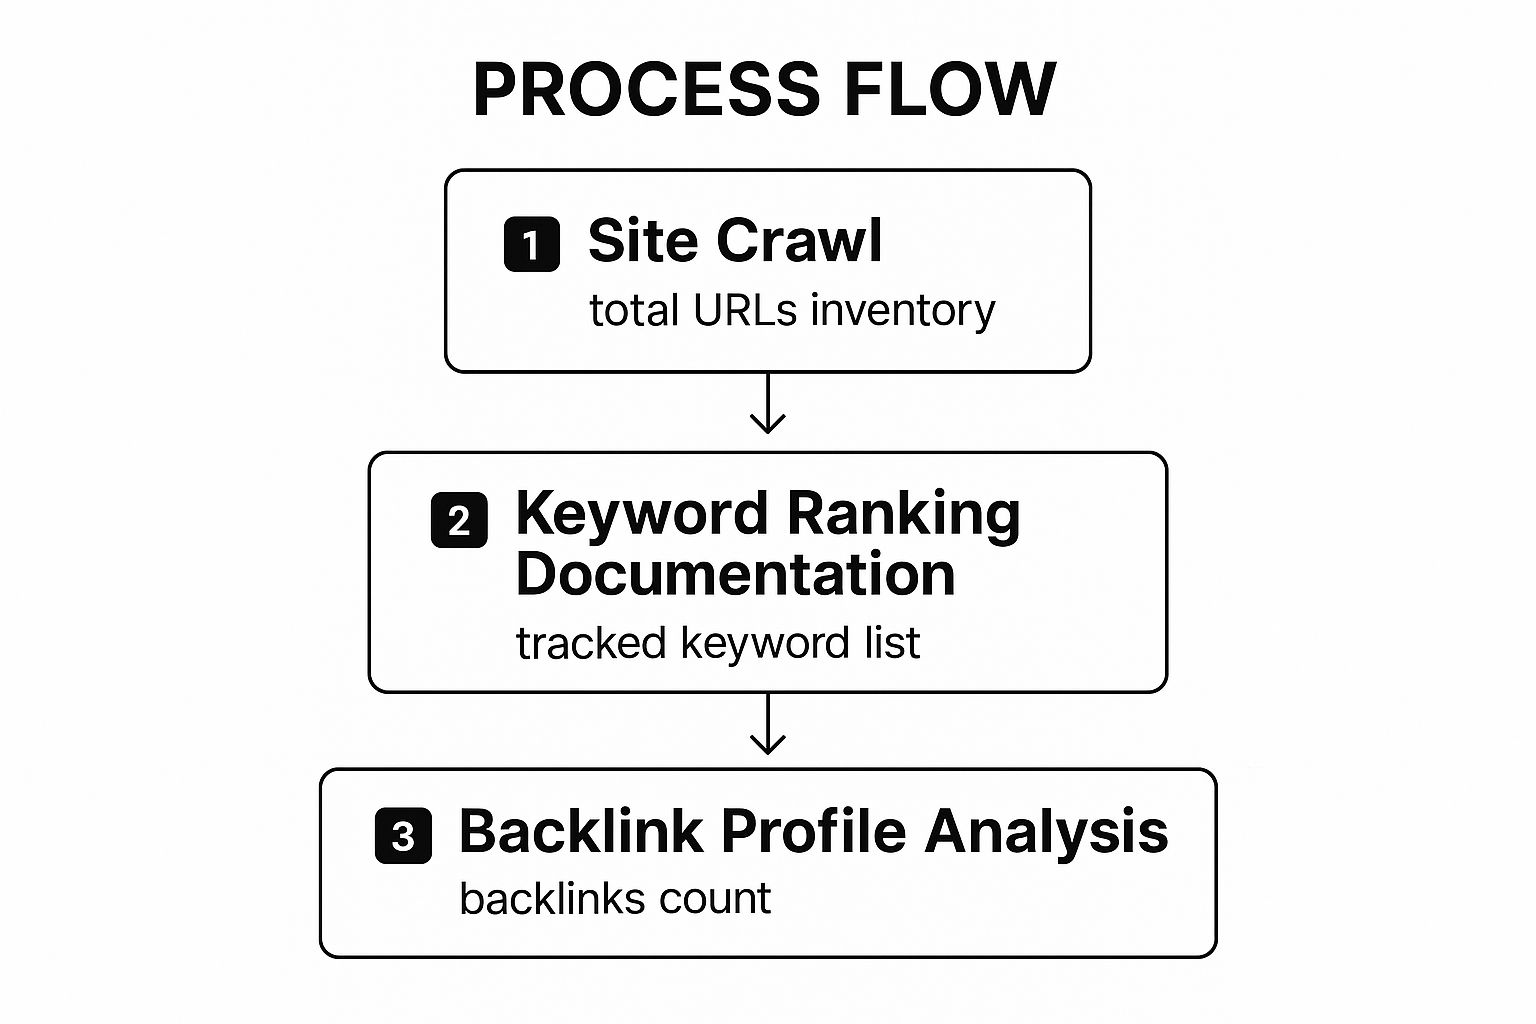
Following this sequential process ensures a complete inventory of your site's most valuable SEO assets is secured before any migration work begins.
2. URL Structure Planning and Redirect Mapping
After auditing and backing up your site, the next critical phase in your website migration checklist is to architect your new URL structure and create a comprehensive redirect map. This involves designing an SEO-friendly URL framework for the new site and meticulously mapping every old URL to its new destination. This process is fundamental to preserving your link equity and preventing users and search engines from hitting dead ends (404 errors).
A well-planned redirect map is the connective tissue between your old and new website, guiding search engine crawlers to the right content. For example, when Etsy migrated its marketplace, it developed intricate redirect strategies for millions of individual product pages to maintain their search rankings. Similarly, The New York Times still maintains redirect maps from its 2014 digital transformation, showing the long-term importance of this step.
Why It's a Critical Next Step
Failing to map URLs correctly is one of the fastest ways to destroy your SEO performance. Without proper 301 redirects, search engines see your new pages as entirely new content, and the authority built by your old URLs is lost. This can lead to a drastic and often irreversible drop in organic traffic. A detailed map ensures a seamless transition, passing link value and guiding users to the right place. A robust redirect strategy is a cornerstone of any successful migration, as outlined in this comprehensive website redesign checklist.
How to Implement Your URL Plan and Redirect Map
- Design Your New URL Structure: Create a logical, user-friendly, and keyword-optimised structure. Aim for simplicity and clarity.
- Create the Redirect Map: In a spreadsheet, list all your old URLs (from your crawl in step 1) in one column and their corresponding new URLs in the next.
- Use 301 Redirects: Ensure your developers implement permanent 301 redirects, not temporary 302s, to signal to search engines that the move is permanent.
- Test in a Staging Environment: Before going live, thoroughly test your redirects in a staging or development environment to catch any errors or redirect chains.
The following video from Aleyda Solis offers expert insights into navigating the complexities of URL mapping during a migration.
By systematically planning your URLs and mapping redirects, you create a solid foundation for a successful launch that protects your hard-earned SEO value.
3. Content Migration and Optimization
The next phase of your website migration checklist involves the systematic transfer of all website content from the old site to the new one. This includes text, images, videos, documents, and crucial metadata. This process is far more than just copying and pasting; it is a prime opportunity to optimise your assets for the new platform, ensure correct formatting, update outdated information, and enhance SEO elements like title tags and meta descriptions.

Think of this step as moving into a new, improved office. You wouldn't just dump your old files in a corner; you would reorganise them for better accessibility and efficiency. For example, when Harvard Business Review migrated in 2020, they optimised over 50,000 articles with improved categorisation and tagging, significantly enhancing user experience and internal linking. As you migrate your content, it’s also an opportune time to implement new content marketing optimization strategies to enhance its overall performance and visibility.
Why It's a Critical Step
Proper content migration is fundamental to preserving your site's value and user experience. Mishandling this stage can lead to missing pages, broken media, poorly rendered text, and a significant drop in SEO rankings. A strategic approach ensures that all content is accounted for, correctly formatted for the new site's architecture, and improved in the process. This meticulous work underpins your entire website content strategy and prevents post-launch chaos.
How to Implement Content Migration and Optimization
- Create a Content Inventory: Use the URL list from your pre-migration audit to map every piece of content from the old site to its new destination.
- Use Automation Wisely: Employ automated scripts or CMS-specific tools for bulk content transfer where possible, but always plan for manual review and clean-up.
- Optimise as You Go: As you move content, review and rewrite title tags and meta descriptions. Optimise images for web performance by compressing them and adding descriptive alt text.
- Test and Verify: Check that all content, especially media like videos and PDFs, renders correctly on the new site across various devices and browsers. Update internal links within the content to reflect the new URL structure.
4. Technical Infrastructure and Performance Testing
After building the new site on a staging server, the next essential step in your website migration checklist is to conduct exhaustive technical and performance testing. This involves rigorously evaluating the new infrastructure, including server response times, database efficiency, security protocols, and overall stability under stress. This phase ensures the new environment is robust, fast, and secure enough to handle real-world user traffic before it goes live, preventing post-launch crashes and a poor user experience.
Think of this as the final shakedown cruise for a new ship before it accepts passengers. You need to push the engine to its limits, test its manoeuvrability in rough seas, and ensure all safety systems are fully operational. For instance, major platforms like Netflix and Amazon simulate massive user loads, including Black Friday-level traffic surges, to guarantee their infrastructure can perform flawlessly. This proactive testing is what separates a smooth launch from a disastrous one.
Why It's a Critical Pre-Launch Step
Launching a new site on untested infrastructure is a significant gamble. A slow, unresponsive, or insecure website will immediately frustrate users and send negative signals to search engines, potentially reversing any SEO gains. Performance testing identifies bottlenecks in your server configuration, database queries, or code before they impact your audience. It validates that your hosting solution can deliver the speed and reliability your business needs, which is a core component of technical SEO and user satisfaction.
How to Implement Your Technical and Performance Tests
- Benchmark Page Speed: Use tools like GTmetrix, Pingdom, and Google's PageSpeed Insights to analyse load times for key pages. Test from multiple geographic locations to ensure a good experience for all users.
- Conduct Load Testing: Utilise services like LoadRunner or JMeter to simulate realistic traffic patterns. Don't just test for a single peak; model genuine user behaviour with varying loads over time.
- Verify Caching and CDN: Ensure that your caching strategies (e.g., Varnish, Redis) and Content Delivery Network (CDN) are correctly configured and are actively reducing server load.
- Test Security Protocols: Run vulnerability scans and penetration tests to check for common exploits. Confirm your SSL certificate is correctly installed and that all security headers are in place.
- Monitor Database Performance: Use monitoring tools to analyse database query times under load. Slow queries are a common cause of poor site performance and must be optimised before launch.
5. Search Engine and Analytics Configuration
Once your new site is built and content is in place, correctly configuring your analytics and search engine tools is paramount. This step involves setting up platforms like Google Analytics and Google Search Console for the new domain or structure, ensuring no data is lost during the switch. It's the digital equivalent of connecting the new building's utilities and security systems before people move in, guaranteeing you can measure performance from the moment you go live.
Think of this as the nervous system of your new website. It allows you to track user behaviour, monitor traffic, and measure conversions accurately. For instance, when Spotify migrated its web platform, it was crucial to preserve sophisticated user behaviour tracking for over 500 million users to maintain its data-driven product development cycle. Proper configuration ensures your business insights and SEO monitoring continue seamlessly.
Why It's a Critical Pre-Launch Step
Failing to configure analytics and search tools correctly makes you blind to post-migration performance. You won't know if a traffic drop is due to a technical error, a broken tracking code, or a genuine SEO issue. Setting up these tools in advance and testing them thoroughly on a staging environment is a core part of a professional website migration checklist. This ensures that from day one, your data is reliable, your goals are tracking, and search engines can properly communicate with your new site.
How to Implement Your Configuration
- Create New Properties: Set up new properties in Google Analytics (GA4) and Google Search Console for the new website. Do not simply reuse the old ones, especially if the domain is changing.
- Use Google Tag Manager (GTM): Implement all tracking scripts (GA4, conversion pixels, etc.) through GTM. This simplifies future updates and allows you to manage all tags from one central dashboard.
- Test in Staging: Deploy your GTM container on the staging site. Use debug modes in GTM and GA4 to verify that page views, events, and conversions are firing correctly before launch.
- Submit New Sitemap: Once live, submit your new XML sitemap directly through your newly configured Google Search Console property to accelerate indexing of the new URLs.
6. User Experience and Functionality Testing
After the technical foundation is laid, the next step in your website migration checklist is to conduct exhaustive user experience (UX) and functionality testing. This involves meticulously checking every user journey, interactive element, and conversion funnel on the new staging site. The goal is to guarantee that the new website not only works flawlessly but also provides a seamless and intuitive experience for every visitor, regardless of their device or browser.
This phase moves beyond technical checks to focus on the human element. You need to verify that forms submit correctly, e-commerce checkouts are smooth, and all user interface components behave as expected. For instance, when Walmart migrated its e-commerce platform, its testing protocol covered more than 50 different device and browser combinations to ensure a consistent shopping experience for millions of users.
Why It's a Critical Testing Step
A technically sound migration can still fail if the user experience is broken. A non-functional "Add to Cart" button, a confusing navigation menu, or a form that won't submit can devastate conversion rates and user trust. This testing phase is your last line of defence against launching a site that frustrates users and harms your business objectives. It ensures that critical paths, such as purchasing a product or filling out a contact form, are not only operational but optimised. The BBC’s migration, for example, incorporated extensive accessibility testing to ensure all users, including those with disabilities, could access their content.
How to Implement Functionality and UX Testing
- Create Detailed Test Scripts: Document step-by-step test cases for critical user journeys. This includes account creation, password resets, newsletter sign-ups, and the entire checkout process.
- Test on Real Devices: While emulators are useful, nothing beats testing on actual physical devices (iPhones, Android phones, tablets, and desktops) to catch device-specific bugs. Use services like BrowserStack to scale this effort across numerous device and browser combinations.
- Include Accessibility Audits: Test your site using screen readers and keyboard-only navigation. Ensure it complies with Web Content Accessibility Guidelines (WCAG) to make it usable for people with disabilities.
- Test All Integrations: Verify that payment gateways work correctly in a sandbox environment. Check that email notifications (e.g., order confirmations, welcome emails) are triggered and formatted properly.
7. Launch Planning and Rollback Strategy
With all technical preparations complete, the next entry in any robust website migration checklist is the development of a meticulous launch plan and an accompanying rollback strategy. This stage involves defining the precise sequence of events for the go-live moment, assigning clear roles and responsibilities, and establishing a safety net in case critical issues arise. It is the command-and-control plan for the final, most sensitive phase of the migration.
Think of it as the flight plan for a rocket launch. Every action is timed, every team member knows their exact duty, and contingency plans are in place for any conceivable anomaly. For example, when Slack undergoes a major platform migration, it includes detailed rollback procedures that have been tested multiple times. Similarly, PayPal's checkout system migrations have historically used feature flags, allowing for an almost instantaneous rollback if performance metrics dip below a certain threshold.
Why It's a Critical Step for a Safe Launch
Without a detailed launch plan, the migration process can quickly descend into chaos. It creates ambiguity, increases the risk of human error, and leaves the team unprepared for unexpected problems. A solid plan provides the go/no-go criteria needed to make a final decision, while a tested rollback strategy ensures you can revert to the stable, old site quickly, minimising downtime and protecting revenue. This organised approach is fundamental to a successful transition.
How to Implement Your Launch and Rollback Plan
- Schedule for Low Traffic: Plan the migration during a period of minimal user activity, such as a weekend or late at night, to reduce potential impact.
- Define Roles and Responsibilities: Create a launch-day run sheet that assigns specific tasks to team members (e.g., who deploys code, who monitors analytics, who communicates with stakeholders).
- Establish Go/No-Go Criteria: Define clear, measurable conditions that must be met to proceed with the launch, such as passing all critical path tests and having key personnel available.
- Prepare a Rollback Procedure: Document the step-by-step process to revert to the old website. This should be tested beforehand to ensure it is fast and reliable.
- Set Up Real-Time Monitoring: Have analytics dashboards, server logs, and performance monitoring tools open and ready to watch for anomalies the second the new site goes live.
8. Post-Launch Monitoring and Optimization
Successfully launching your new site is not the end of the journey; it’s the beginning of a critical observation phase. Post-launch monitoring is the ongoing process of tracking your new website's performance, user behaviour, and technical health to ensure the migration has met its goals. This systematic surveillance allows you to quickly identify and rectify any issues that weren't caught in testing, thereby safeguarding your SEO rankings and user experience.
Think of this as the post-operative care for your digital presence. Just as a surgeon monitors a patient's vital signs after a major procedure, you must monitor your site's metrics to ensure it recovers and thrives. For instance, after its migration, Basecamp famously monitored not just technical data but also customer satisfaction surveys and support ticket volumes to get a holistic view of the transition's impact on users. This comprehensive approach is a cornerstone of a successful website migration checklist.
Why It's a Critical Final Step
Neglecting this phase is like abandoning a construction project the moment the final brick is laid. Issues like broken redirects, increased page load times, or a spike in 404 errors can emerge under the stress of real-world traffic. Continuous monitoring provides the data needed to react swiftly, fix problems before they cause significant damage to your search visibility, and optimise the site based on actual user interaction. To ensure the continued health and optimal performance of your newly migrated website, investing in the right cloud monitoring tools is essential for effective post-launch monitoring and optimisation.
How to Implement Post-Launch Monitoring
- Set Up Automated Alerts: Configure alerts in Google Analytics, Google Search Console, and your performance monitoring tools for drastic changes, such as a drop in traffic, an increase in 404 errors, or server issues.
- Track Key Metrics Daily: For the first 30-45 days, closely watch your key performance indicators. This includes organic traffic, keyword rankings, bounce rate, conversion rate, and page load speed.
- Compare Pre- and Post-Migration Data: Regularly compare your new performance data against the baseline you established in the pre-migration audit. This helps quantify success and pinpoint specific areas of decline.
- Gather User Feedback: Actively seek feedback through surveys or by monitoring support channels. Users often spot usability issues that automated tools might miss.
This vigilant oversight ensures that any migration-related problems are resolved quickly, solidifying the long-term success of the project. This is a key part of the ongoing work needed to elevate your online presence with essential website maintenance services.
Website Migration Checklist Comparison
| Item | Implementation Complexity 🔄 | Resource Requirements ⚡ | Expected Outcomes 📊 | Ideal Use Cases 💡 | Key Advantages ⭐ |
|---|---|---|---|---|---|
| Pre-Migration SEO Audit and Backup | Medium – requires technical SEO knowledge | Moderate – SEO tools and expertise needed | Baseline SEO metrics, backup of URLs and metadata | Large site migrations needing SEO risk mitigation | Prevents content loss, identifies SEO issues |
| URL Structure Planning and Redirect Mapping | High – complex planning for large sites | High – requires ongoing maintenance | Maintained SEO rankings, minimal 404s and traffic loss | Sites redesigning URL hierarchy or platform shift | Preserves link equity, improves site structure |
| Content Migration and Optimization | Medium to High – manual and technical work | High – content audits, formatting, optimizations | Improved content quality and SEO on new platform | Content-heavy sites migrating to new CMS | Enhances SEO, removes outdated content |
| Technical Infrastructure and Performance Testing | High – specialized technical knowledge | High – require tools and expertise | Optimized performance, secured and scalable site | Complex sites anticipating high traffic and security needs | Identifies bottlenecks, prevents downtime |
| Search Engine and Analytics Configuration | Medium – multiple tool integrations | Moderate – setup and testing effort | Maintained analytics continuity, real-time SEO monitoring | Sites needing data-driven decision making | Preserves data, enables quick issue detection |
| User Experience and Functionality Testing | High – resource-intensive manual testing | High – requires diverse devices and testers | Improved usability, preserved conversions | E-commerce and interactive sites | Prevents functionality issues, ensures accessibility |
| Launch Planning and Rollback Strategy | Medium – detailed coordination needed | Moderate – planning and monitoring resources | Minimized launch risks, clear rollback plan | Critical launches requiring risk mitigation | Ensures smooth launch, quick issue resolution |
| Post-Launch Monitoring and Optimization | Medium to High – ongoing effort | Moderate to High – continuous monitoring | Ongoing improvements, sustained performance | Any site post migration needing performance stability | Enables rapid fixes, supports data-driven updates |
Executing a Seamless Migration for Future Growth
Navigating a website migration can feel like a high-stakes operation, but with a structured, methodical approach, it becomes a powerful catalyst for growth rather than a source of risk. The comprehensive website migration checklist we have explored is more than a series of tasks; it is a strategic framework designed to protect your digital assets while paving the way for a stronger, more resilient online presence. By meticulously working through each phase, you transform a potentially disruptive event into a clear opportunity for enhancement.
The journey begins long before the launch day. The initial steps of conducting a thorough SEO audit, meticulously mapping 301 redirects, and ensuring a complete backup of your existing site are the foundations of success. These pre-migration tasks are non-negotiable for preserving the search engine authority you have spent years building. Neglecting this groundwork is the most common reason migrations fail, leading to catastrophic drops in traffic and rankings.
From Blueprint to Launch: A Synthesis of Strategy
As you move from planning to execution, the focus shifts to technical precision and user-centric optimisation. The checklist guides you through:
- Content and Technical Integrity: Ensuring every piece of content, from blog posts to product descriptions, is transferred and optimised for the new platform. Simultaneously, rigorous performance testing on the new infrastructure guarantees a faster, more reliable experience for your visitors.
- Analytics and User Experience: Correctly configuring tools like Google Analytics and Search Console is vital. This ensures you have continuous, accurate data from the moment you go live. Alongside this, exhaustive user experience testing across different devices and browsers confirms that every interactive element functions as intended, preventing user frustration and abandonment.
- Launch and Post-Launch Vigilance: A detailed launch plan, complete with a rollback strategy, provides a crucial safety net. However, the work does not stop once the new site is live. Proactive post-launch monitoring is essential for catching any unforeseen issues, analysing performance metrics, and making data-driven optimisations to capitalise on your new platform’s potential.
Key Takeaway: A successful website migration is not a single event but a continuous process. It starts with deep preparation, moves through a phase of precise execution, and concludes with a period of diligent monitoring and refinement. Each step in this checklist is a critical link in a chain that protects your past achievements and secures your future digital success.
Ultimately, mastering this process provides a significant competitive advantage. It allows your business, whether you are an entrepreneur in East Anglia or an established eCommerce retailer, to evolve its digital home without sacrificing performance or visibility. You are not just changing your website's address; you are upgrading its foundation, enhancing its capabilities, and setting the stage for sustained growth and improved user engagement. This organised, strategic approach ensures your new website launches not with a stumble, but with a confident stride towards a more successful digital future.
Navigating the complexities of a website migration requires expertise and meticulous attention to detail. If you want to ensure a seamless transition that protects your SEO and enhances performance, the specialists at Ibertech Solutions Limited are here to help. Contact us to see how our expert web development and digital marketing services can manage your migration from start to finish, allowing you to focus on growing your business.